Since I wrote my last blog post, “My Experience Using Kindle Create”, a number of people have been asking for my help in using Kindle Create to format their manuscripts. But before you can use Kindle Create, you first need to format your manuscript in Microsoft Word.
This is an excerpt taken from my book “The Beginner’s Guide to Self-Publishing: How to Self-Publish a Kindle Book and a Paperback on Amazon KDP”. This book is available in print and Kindle format on Amazon.
Before you import your manuscript to Kindle Create, it is recommended that you format your manuscript in Microsoft Word first. I still have Windows 8 and I am currently using Microsoft Word 2013 to edit and format my documents so please bear in mind that the following instructions are for people who use Windows.
Using Microsoft Word is the easiest way to convert your manuscript into an eBook. You can use the Kindle Previewer to check if your manuscript converted into an eBook successfully and is compatible with all Kindle devices.

Know What Doesn’t Convert Well into eBooks
In Microsoft Word, certain elements do not convert well into eBooks. Bulleted and numbered lists with subcategories do not convert well. Page numbers are not required because the eBook is reflowable, meaning that the words on the page will adapt to any screen size. EBooks do not need headers or footers so you can delete them from your manuscript. Do not include page numbers when you create a table of contents because it will not be updated correctly when you publish your eBook. Page numbers are not required in a reflowable book.
Paragraph and Line Spacing
Pressing the Tab button to indent a paragraph will not show in a Kindle book. There is a much easier way to indent paragraphs and to set line spacing in your manuscript. The following instructions are for Microsoft Word 2013, but may also apply to similar versions:
- Highlight the paragraphs you want to indent. If you want to format the whole document, press CTRL+A to select the whole document. (Please note that your chapter titles will also be formatted in addition to all the paragraphs.)
- Right-click and select Paragraph. The Paragraph box will open.
- In the Indentation section under Special, select First Line. Under By: set the indent to 0.2 or 0.5, whichever you prefer.
- In the Spacing section, under Line Spacing, select Single and click OK.
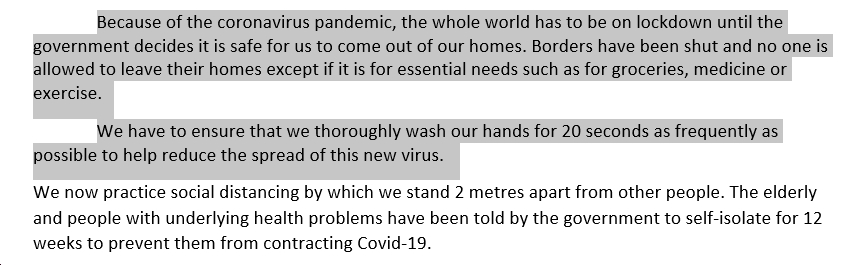
Your Word document should have the following results:
Choose a Style for your Chapter Titles
You need to format your chapter titles so that they can be included in your Table of Contents. It also helps the reader to see where a chapter ends and where one begins. There should be a new chapter for each new topic. This is how you format chapter titles:
- In Word, highlight the chapter title.
- Select Heading 1 from the Styles section in the toolbar above.
- Select the Centre alignment from the Paragraph section in the toolbar.
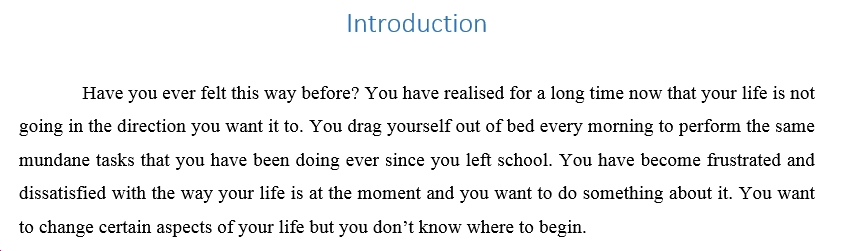
Your chapter title should look like this:
Create a Table of Contents
Your eBook should contain a table of contents because this helps the reader to navigate to the page of the chapter they want to read. Because you are formatting your book for Kindle, your Table of Contents does not need to have page numbers. Each chapter title listed in the table of contents will be a hyperlink that the reader can click on to take them directly to the chapter they want to read. Please ensure that you have formatted all of the chapter titles in your manuscript so that they are included in the Table of Contents. Here are the instructions for creating a Table of Contents page in Word:
- Position your cursor and click at the top of the page where you want the Table of Contents to appear.
- On the toolbar, click on the References tab and click on Table of Contents.
- Select Automatic Table 1 or Automatic Table 2. The table of contents will appear on the page.
- Click on Table of Contents again and select Custom Table of Contents. The Table of Contents box will appear.
- The option ‘Show page numbers’ would have been pre-selected. Click the checkbox to deselect the option.
- Ensure that the ‘Use hyperlinks instead of page numbers’ option is selected and then click OK.
- The following confirmation message will appear: ‘Do you want to replace the selected table of contents?’ Click OK.
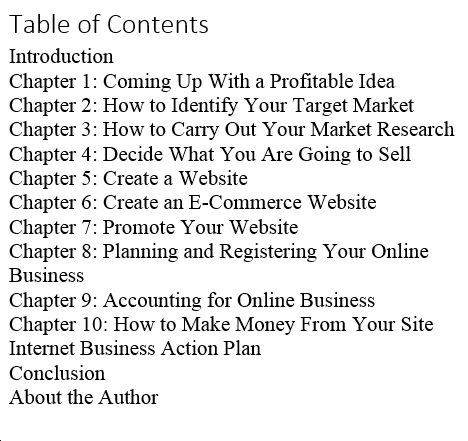
This is how your table of contents should appear:
Hover the cursor over a chapter title in the Table of Contents and press CTRL+click to follow the link to the chapter.
Insert Page Breaks
Each chapter of your eBook should start on a new page. Using the Return key to move content to a new page does not convert well in a published eBook. Instead, you should use Page Break wherever you want one page to end and a new page to begin.
- Click on the area where you want the page to end.
- Click on the Insert tab and click Page Break. The current page will end and will move on to the next page.
Include Front and Back Matter in your eBook
Your eBook should include front matter such as the title of your book and the name of the author. You should also include a Copyright page. It is optional if you want to include a Dedication page.
- On the first page of your manuscript, enter the title of your book, a subtitle if you have one, and the name of the author. You can also include the copyright info: Copyright © 2021. All rights reserved.
- Highlight the title. On the Home tab in the toolbar above, select Title from the Styles section.
- If you have a subtitle, highlight it and select Subtitle from the Styles section.
- Use Font Size 18 for the name of the author.
- Highlight the title, subtitle, and author’s name and click on the Centre alignment in the Paragraph section on the Home tab. Space out the title, subtitle, and author’s name how you want it to look on the page.
- On the Insert tab, click on Page Break to end the current page.
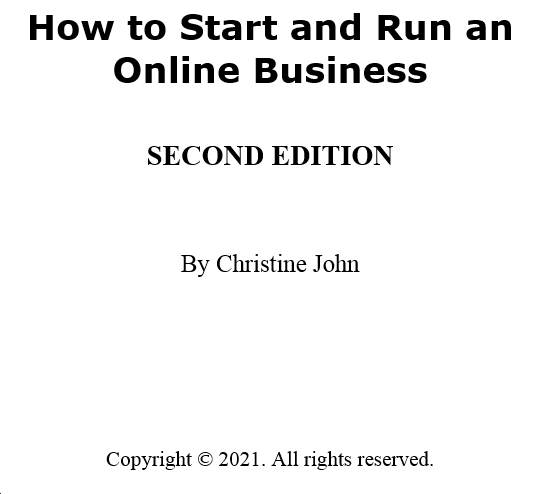
Your title page may look like the following:
The following is an example of copyright information you should include in your eBook. The copyright page usually comes on the next page after the title page. You can use this template in your eBook.
Copyright © 2021 Author Name.
All rights reserved. This book or any portion thereof may not be reproduced or used in any manner whatsoever without the express written permission of the publisher except for the use of brief quotations in a book review.
Publisher Name
10 Anywhere Ave.
City, County, Postcode
www.yourwebsite.com
Insert and Format Images in your eBook
KDP recommends that all images in your eBook should be submitted at 300 pixels per inch. KDP does not support TIFF, multi-frame GIFs, or any image with transparency because these types of images will not convert well on Kindle devices or e-readers. Instead, it is better to use JPEG or PNG images in your eBook. There is an easy way to ensure that your images are 300 pixels by using free photo editing software.
- Download and install GIMP (GNU Image Manipulation Program) from the Gimp.org website.
- Right-click on an image saved on your computer and select Edit with GIMP. This will open the GIMP program displaying the selected image for editing.
- Click on Image on the toolbar at the top of the page and select Print Size.
- Ensure that the print size of the image is in inches (in). In the X Resolution box, change it to 300.00 pixels and do the same in the Y Resolution box.
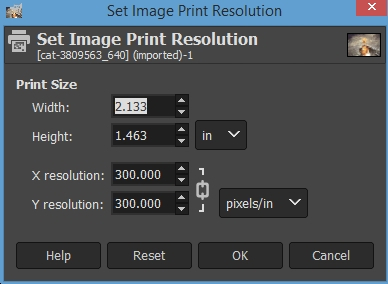
5. Click Ok. The size and resolution of the image will be adjusted.
6. Click File, Save As, and save the image in your folder.
7. Click File and Export As. Enter a new name of the image.
8. click on Select File Type (By Extension). Scroll down and select JPEG image.
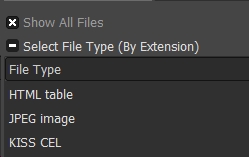
9. Then click Export. The image will be exported as a JPEG.
10. In Word, click the area where you want the image to be placed on the page.
11. Click on the Insert tab and select Pictures.
12. Click on the image you edited in GIMP that you want to add to your eBook and click Insert.
Insert Hyperlinks to your Text
KDP allows you to include hyperlinks to text in your eBook. These could be links to your website, to your other books sold in the Amazon marketplace, to other products and services, or information on other websites. Follow the instructions to create a hyperlink:
- In Word, highlight the text you want to link.
- On the Insert tab, click on Hyperlink in the Links section. A dialogue box will open.
- Enter the website address you want to link to in the Address field. If it is a long URL, you could also copy and paste it into the Address field.
- Then click OK.
This is an example of how a hyperlinked text appears in an eBook:

Include Footnotes
If you want to cite references to your text, you can do this by placing a footnote at the bottom of the page to cite your references or to make a comment about a particular text in your eBook.
- Place the cursor on the page where you want the footnote to appear.
- Click on the References tab in the toolbar and click Insert Footnote in the Footnotes section.
- The cursor will jump to the bottom of the page and create a footnote section. A number will also be placed next to the word that a footnote was created for.
- Enter your footnote in this section. When you publish your eBook your footnote will automatically convert to endnotes.
Here is an example of a footnote:


Proofread Your Manuscript
Now that you have formatted your manuscript, you need to go back to the beginning and read through it to ensure that there are no mistakes. When you proofread and edit your manuscript, check for the following:
Spelling and grammar: Go to the Review tab and click on Spelling & Grammar in the Proofing section to ensure that there are no spelling or grammatical mistakes in your manuscript.
Page Breaks: Ensure that you have correctly placed page breaks to start new chapters on the next page.
Page Numbers: Remove page numbers, headers, and footers from your manuscript. These elements are not required because your eBook will be reflowable. To remove page numbers, double click in the header section, highlight the page number and any text, and press Delete. The header section will be removed. Do the same for the footer section.
Cover Image: You don’t need to include the cover image in your manuscript. KDP will automatically include the cover image that you submitted during the eBook setup when you upload and publish your eBook.
Charts, Shapes, Text Boxes, and Diagrams: If you want to include a chart, shapes, a text box, or a diagram, KDP advises that it is better to save them as images and insert them into your eBook, rather than creating them in Word.
In this blog post, we have covered how to format your manuscript in Microsoft Word. You learned how to indent paragraphs and set line spacing. You also learned how to format the chapter titles, create a Table of Contents, insert page breaks, and insert a footnote, and format images in your book. I also included a section on how to proofread your manuscript. I hope that you found the information in this post very helpful. In my next blog post, I will show you how to use Kindle Create to format your document into an eBook.