
Last week we covered how to publish your book as a Kindle eBook. Today, I will show you how to format and upload your manuscript to be published as a paperback on Amazon.
Kindle Direct Publishing on Amazon offers a Print on Demand (POD) publishing service. Twenty years ago, Amazon stored books in a large warehouse. When you ordered a book online, someone would have had to collect the book from the warehouse, pack it, ship it and deliver it to you. The beauty of POD publishing is that the book you ordered is printed after you have placed your order. The book is simply printed out, packed and shipped to you in a couple of days. Amazon no longer needs a warehouse to hold thousands of copies of books.
Self-publishers appreciate POD publishing because of how fast they can publish their book and have it shipped to their readers in just a few days. The other advantages of using Print-on-Demand publishing are that you don’t have to worry about paying for bulk printing of your book, storing hundreds of copies in a warehouse, processing customers’ orders, or shipping. Amazon takes care of everything. All you have to do is format and upload your manuscript and book cover.
If you already published your book in Kindle format, you can use the same image for your book cover by using Amazon’s Cover Creator tool. As for your manuscript, make a copy of your file and follow the instructions below to publish your book as a paperback.
Step 1: Format the interior of your book.
- Set the trim size (i.e. width and height) of your book. Open your manuscript in Microsoft Word.
- Click on Page Layout tab and click on Size.
- Select More Paper Sizes from the drop down list. Make sure that the Paper tab is selected.
- Change the width to 6” and height to 9”. Then click Ok. This is the size the book will be when it is printed. If you want a different size, check out the other trim sizes here.
- On the Page Layout tab, click on Margins. Click on Custom Margins from the drop down list.
The size of the margins depends on the number of pages you have written. Amazon provides a chart which you can use as a guide to determine how you will set the margins of your printed book.
For example, to set the margins for a book containing 70 pages, enter 0.25” in the Top, Bottom, Left (inside) and Right (outside) margins and enter 0.375” in the inside (gutter) margin. Select Mirror Margins in the Multiple Pages drop down list and then click OK.
Step 2: Format Chapter Titles and Page Breaks.
- If you have not already done so, highlight each chapter title and on the Home tab, select Heading 1 in the Styles section.
2. In the Paragraph section, select the Center alignment so that the chapter title is in the centre of the page. Ensure that each chapter starts on a new page.
3. Click on the Insert tab and select Page Break at the end of each chapter so that another chapter can start on a new page.
Step 3: Format the Title Page and Copyright Page.
The title page and the copyright page are the front matter of your book. Ensure that you have a separate page for each.
- On the title page, highlight the title and on the Home tab, select Center in the Paragraph section to place the title in the centre of the page. In the Font section, change the font and font size of the title text.
2. If you have a subtitle, use the same font that you used for the title and choose a smaller font size and put the text in Italics. Align the subtitle text in the centre.
3. For the author name, you can choose the same font as your title and subtitle or you can select a completely different font. Select a smaller font size and align it in the centre.
4. If you have not done it yet, type the following information on the copyright page and align it in the centre:
Copyright © 2020 Author Name
All rights reserved.
ISBN: 9780000000000
Website: www.example.com
All rights reserved. This book or any portion thereof may not be reproduced or used in any manner whatsoever without the express written permission of the publisher except for the use of brief quotations in a book review.
If you chose to use the free ISBN number from Kindle Direct Publishing, enter this number on the copyright page. You can also include your website address if you have one.
Step 4: Add Page Numbers to Your Book.
If you are unsure where to add page numbers, take a look at other printed nonfiction books for ideas. The page number can be added at the top or at the bottom of the page.
Click on the Insert tab and click on Page Number in the Header & Footer section. Select the Top of Page and then select Plain Number 3.
Step 5: Create a Table of Contents (TOC) page.
- Using your mouse, click on the area where you want the Table of Contents to appear. It should be placed on the next page after the copyright page.
2. Click on the References tab and click on Table of Contents. Select Automatic Table 2. Choose the font, font size, and alignment to format the TOC title.
3. If you make any changes to the pages in your manuscript, you may have to update the Table of Contents. Click on the Table of Contents and at the top of the TOC title, click Update Table, select Update Entire Table and click OK.
Step 6: Proofread your Manuscript and Export to PDF.
Once you have completed the formatting of your manuscript, read through the entire document to ensure that there are no spacing issues, spelling or grammatical mistakes. Ensure that each chapter starts on a new page and that the Table of Contents is up to date. Once you are satisfied with your formatting, save your manuscript as a PDF.
- Click on the File tab, select Export, and click on Create PDF/XPS.
2. Then click Publish. Your manuscript will be saved as a PDF document and will be ready to upload to Kindle Direct Publishing.
Step 7: Upload Your Manuscript and Book Cover to KDP.
- Sign in to Kindle Direct Publishing. This will take you to the Bookshelf.
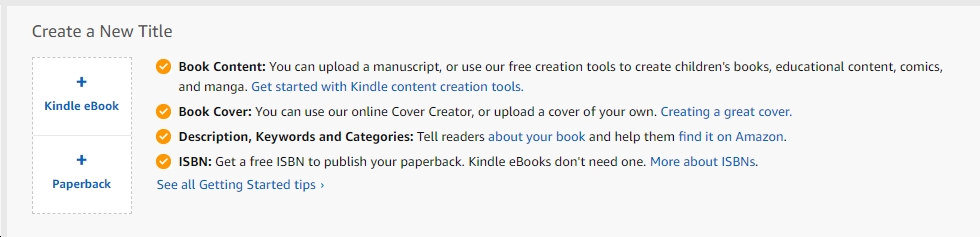
2. In the section, Create a New Title, at the top, click on Paperback. This will take you to the Paperback Details page.
3. All the details you entered for your Kindle eBook can also be used to fill in the details for your printed book. Enter the book title, name of the author, and description of the book.
4. Also, enter keywords that you believe people use to find your book and choose two categories for your book and any other information that is required on the Paperback Details page.
If you are not sure or cannot remember what information to enter in the fields on this page, please refer to last week’s blog post about publishing a Kindle eBook on Amazon.
5. When you have filled in all the sections on this page, click Save and Continue to go on to the next page.
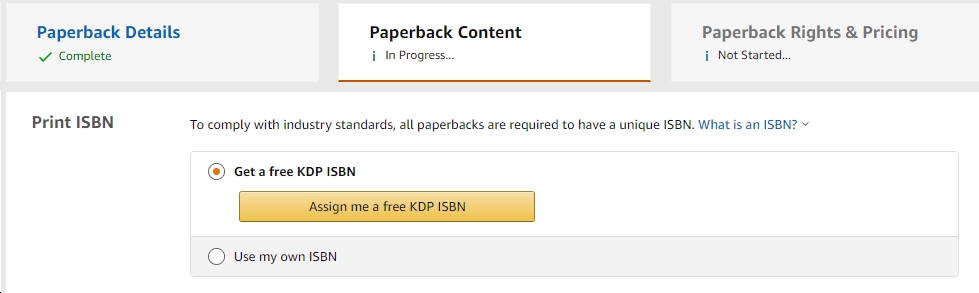
6. On the Paperback Content page, in the Print ISBN section, click on Assign me a free ISBN number if you don’t already have one. Kindle Direct Publishing will automatically generate an ISBN number that you can add on the copyright page of your printed book.
7. For the Publication Date, if you are publishing your book for the first time, enter a date that you expect your book to be published. If you are not sure of the publication date, you can always leave this section blank. This section is optional. You don’t have to enter a date.

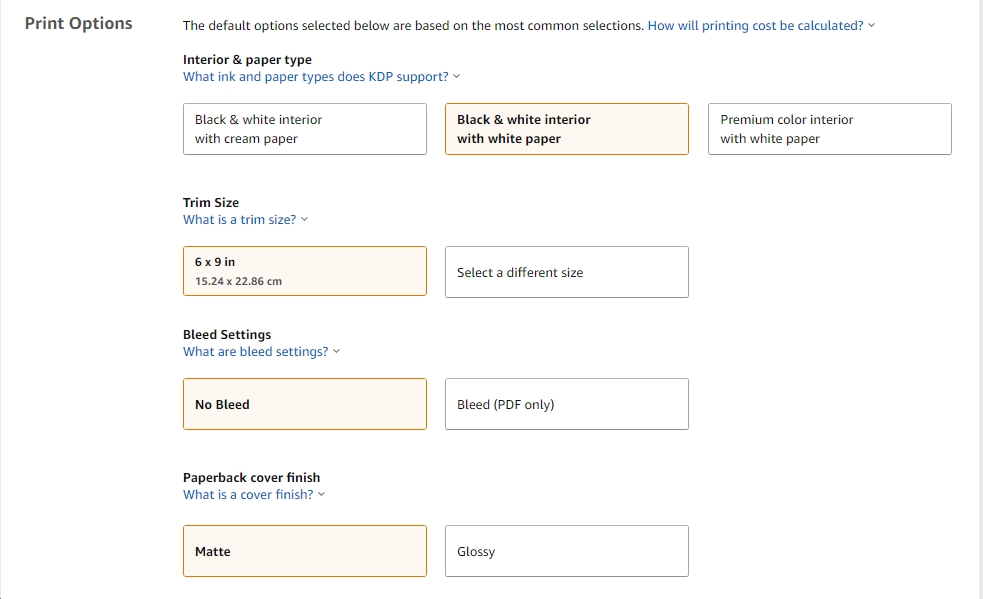
8. The Print Options section is where you will choose what type of paper you want the interior of your book to be printed on, the size of your book, and what kind of cover you want on your book as well.
9. For the Interior & Paper Type, you can choose to print your book in black & white or in color. Just so you know, printing in color will cost more than printing in black & white, so you will have to come up with a higher price for your book to cover the costs of printing in color.
10. Next, select the Trim Size of your book. The trim size is the dimensions of your book once it is printed. If your book contains a lot of images, then I would suggest choosing 6×9 in as the trim size so that your images can be printed clearly. If your book only contains text, then you can click ‘Select a different size’ to select a smaller trim size for your book.
11. For the Bleed Settings, only select Bleed (PDF only) if you want your images to be printed at or off the edge of the page. If your images don’t bleed, select No Bleed.
12. For the Paperback Cover Finish, you can choose Glossy to have a glossy look to your book cover or Matte to have a matte finish. I always prefer to have a glossy cover finish in my book.
13. In the Manuscript section, if you have followed the guidelines to format your book as a paperback, then you are ready to upload your completed manuscript. Click on the Upload paperback manuscript and remember that you have to upload the PDF version you saved to KDP. A message will appear to show that you have uploaded your manuscript successfully.

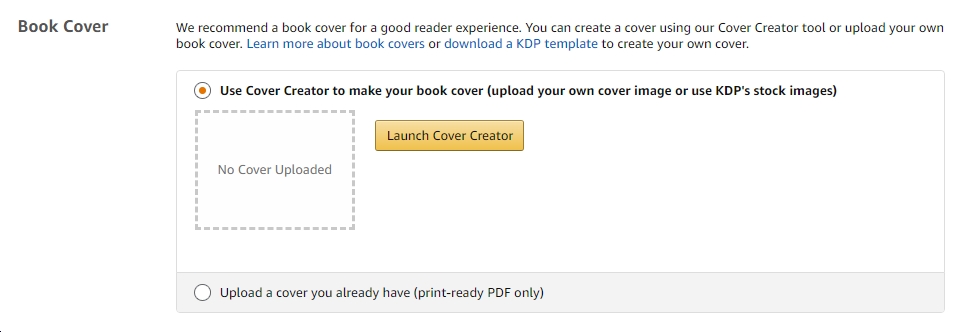
14. In the Book Cover section, you have the option of uploading a book cover that you already have, or you can use the Cover Creator tool to create a new book cover. If you prefer to use KDP’s Cover Creator to design a new book cover then click Launch Cover Creator and follow the instructions to create beautiful cover art for your book cover.
On the other hand, if you already have a book cover, click on ‘Upload a cover you already have (print-ready PDF only)’. Remember that you need to design the front cover, back cover and spine. The dimensions have to be exactly what KDP requires to print a high quality book. This can be really difficult if you do not have graphic design skills.
If you are new to self-publishing and this is your first time publishing a paperback book, then I recommend designing your book cover using KDP’s Cover Creator tool.
15. Once you have completed designing your cover art, you can then click on Save & Submit in which the Cover Creator tool will automatically upload your book cover image to KDP. You will see a message that your cover was uploaded successfully.
Before you publish your book, it is always wise to preview your file to ensure that there are no formatting or printing issues with your manuscript and your book cover.
16. Click on Launch Previewer in the Book Preview section so that you can have an idea of what your book will look like when it is published in Paperback format.
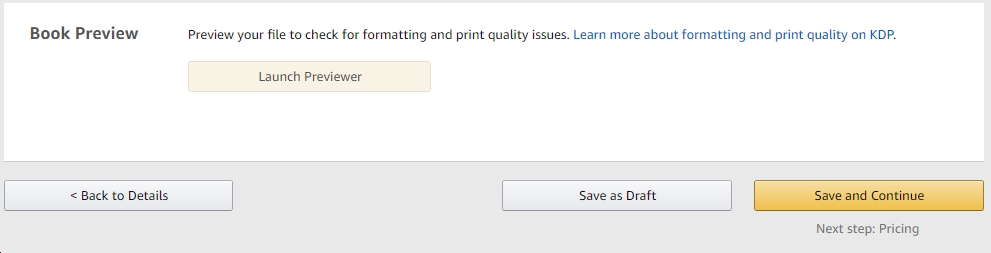
17. If you have discovered any issues with your manuscript such as spelling or grammatical mistakes or any formatting errors, you can fix them in your original file. Click Exit Print Previewer and then go to your file and fix the issues that were identified in the Print Previewer.
18. Then save the updated version as a PDF and then re-upload to KDP. If you have an issue with your book cover you can fix it in the Cover Creator tool. Then save and resubmit the cover art to KDP.
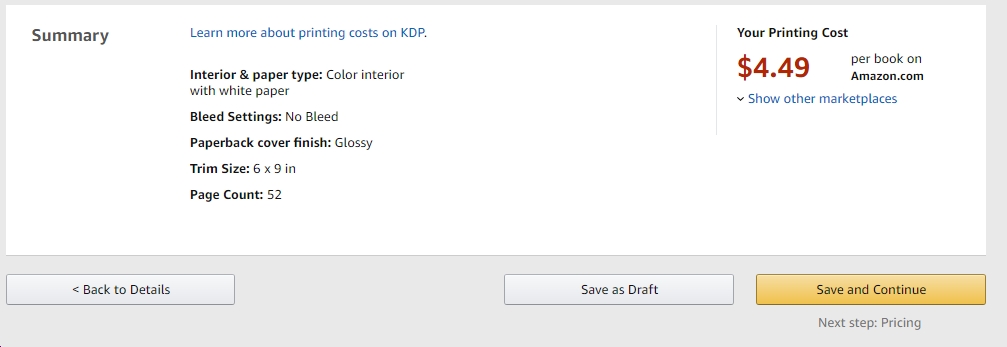
19. If you are satisfied with the interior of your book and the book cover, click Approve. You will be taken back to the Paperback Content page.
20. KDP will then provide a summary of the printing details of your book and the printing cost. Click Save and Continue to go on to the Pricing page.
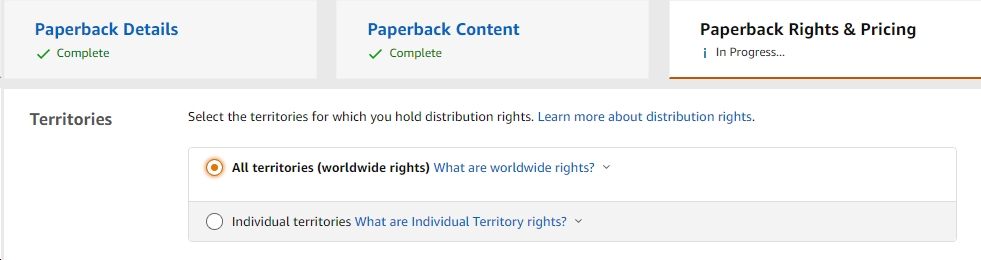
Step 8: Select the Price and Royalty Plan for your Paperback Book.
- On the Paperback Rights and Pricing page, first select the territories, in the Territories section, where you hold distribution rights and where you would like your book to be sold. You can either select All Territories (worldwide rights) where your printed book will be sold on all Amazon websites, or select Individual territories and tick the boxes next to all the countries where you have distribution rights.
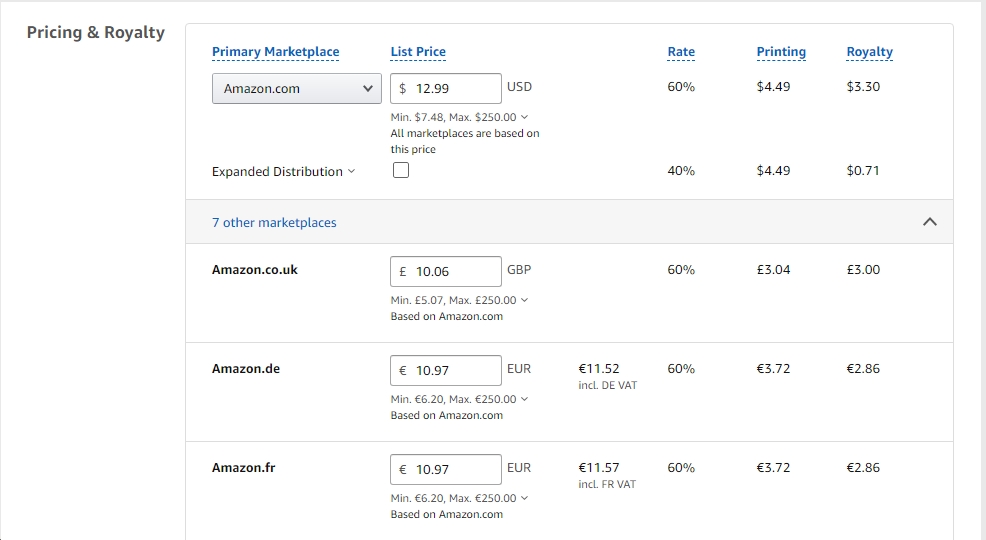
2. Set the price of your book in the Pricing & Royalty section. KDP has set a minimum price of $7.48 to cover the cost of printing your book and to ensure that you receive royalties. However, you can enter a higher price so that you earn more royalties from the sale of your book. Your price has to be higher than $7.48 and cannot exceed $250. The List Price you enter will be the price a customer will see on your book’s detail page on Amazon. The list price will automatically be entered on Amazon’s other marketplaces based on the price you set.
3. Click on Expanded Distribution if you want your book to reach more readers outside of Amazon, such as libraries, online retailers, bookstores and academic institutions. You will have to increase the price of your book if you want to earn royalties from book sales through expanded distribution.
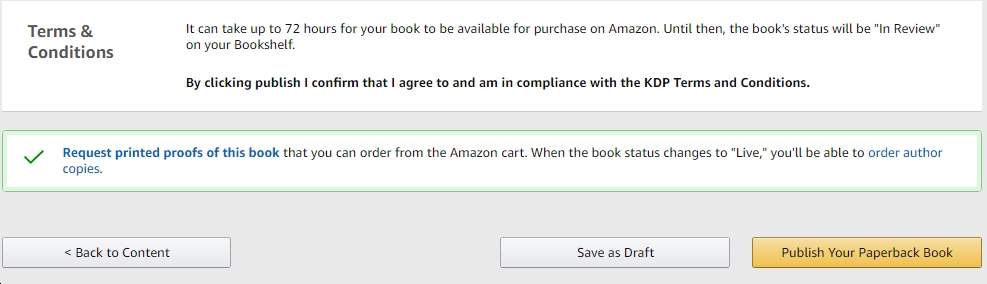
4. Read the Terms & Conditions and then click Publish Your Paperback Book. A message will pop up confirming that you have successfully published your book. Your printed book will be available to purchase from Amazon within 3 to 5 business days.
I hope that after reading and following the guidelines from each blog post over the last few weeks has given you the tools and confidence you need to self-publish your book in eBook and paperback format on Amazon and Draft2Digital. We have come to the end of the self-publishing series and I hope that this will inspire and motivate you to write and publish your book.